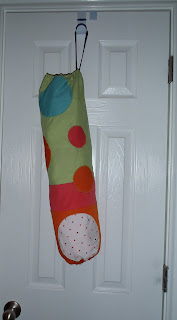
A project I've always wanted to do was to make a dispenser / holder for plastic grocery bags. I figured this was as good a time as any. It took me a while bc I have to take lots of breaks bc of my neck, but I imagine a pain free person could knock it out in an hour or two. Here's what I did:
Cut up some rectangular sections of fabric. Mine were about 20" wide, but it's not an exact science, and I don't really care. I did 3 colors of scrap fabric the height I wanted my bag to be.
Pin the sections right side together.
Sew. I used a 5/8" seam allowance, but I'm sure 1/4" would also work. (used flash for this photo, that's why colors are different)
Repeat for any other seams.
Press seams. I pressed them in one direction, but you could also press them open if you're using a 5/8" seam. 1/4" keep in one direction.
Now applique whatever you want. I love circles and it gave me an excuse to use my circle cutter.
For my circles, I tried all kinds of things.
- I wanted to sew a seam like a yo yo on my machine - that didn't work so well.
- I tried the sew in a circle using a thumb tack technique - that really didn't work. I think maybe you have to have more fabric?
I decided to go with a traditional blanket stitch which my Bernina happily stitches for me.
So I arranged and pinned my circles onto the flat sections I sewed. I did not use the HB.
I used the aforementioned blanket stitch. I played with different stitch widths and lengths.
Here's what it looks like on the back. I had to mess with thread tensions, too. I don't think I had it quite right.
After you're done appliquing (is that a word?), I don't have a photo for it, but pin your fabric lengthwise right sides together. Sew.
Sew an elastic casing on each end of the, now, tube. I used 1/4" elastic bc that's what I had. I put the elastic up to the fabric, folded it down (wrong sides together) over the elastic so that I knew how big to make the casing. Then, pin, and sew leaving about an inch open at the end to have room to stuff your elastic in.
Attach a safety pin to one side of the elastic, and guide it through the casing. I did not measure the elastic. Instead, I left it in one big piece in the package. After fitting it in the casing, then I cut it. If yours is already cut, make the other end doesn't slide into the casing. You can use another safety pin to hold that end in place.
Gather the hole you want to stuff your bags into. Sew the ends of the elastic together.
Then sew down the 1" opening you left to put your elastic in.
Repeat this on the other side of the tube. Your opening for where you pull out the plastic bags should be smaller than where you stuff them in.
Now you'll need a handle to hang it with. I had some leftover quilt binding (not bias binding) that I used. I just used an overlock stitch on my Bernina, but I could have serged it with my serger or just sewn right sides together and turned it. I thought it looked more neato with the funky colored thread I used.
Then I put each end of the strip on either side of my tube near the top casing/elastic. Pin and sew.
Stuff it with bags at the top and hang it up. Pull out bags from the bottom. That's it!


Much cuter than the one I made!
ReplyDelete