While I was waiting, this weekend I made my own cheese press. As I told the guy at Lowes when he asked what does a cheese press do, it presses cheese.
From what I gather in my cheesemaking reading so far, there are some basic stages which vary depending on the type of cheese. Softer cheeses are faster, have more liquid, and are generally easier. Harder cheeses can take months to a year to age and are usually more labor intensive. But, as I said, it all varies.
Some cheese making steps in a nutshell:
- Add some stuff to milk to get it to curdle
- Maybe cook it
- Squeeze liquid out
- Cut the cheese (curdles)
- Use a cheese press to get liquid out
- Age the cheese
So, what the hell is a cheese press? It presses cheese! Really, it uses specific weight amounts to squeeze out remaining liquid in your cheese curd concoction so that the cheese hardens. You only use the cheese press for a few hours to max of 2-3 days - but that's for fancy cheeses. It presses the cheese into a molded shape which is where you get the cheese wheel from. It's usually cylindrical to get the weight evenly distributed.
How a Cheese Press Works
To demonstrate, I have borrowed / swiped someone else's photo and altered it since my press is not in action yet
There are all manner of homemade cheese press designs out there. Here are a few more cheap-ass creative ones:
To make the hard cheeses, I'm going to need a cheese press. The cheapest ones you can buy are around $50-60 with shipping. They can also range in the $200-300 area for fancy home cheese presses. Then there are professional ones which are way too much for me. There's lots of patterns and ideas out on the internet, but here's what I came up with.
My creation - under $3
What you'll need:
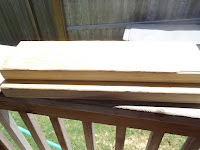
- 2 - 2"x6" boards ~14-16" long
- Free from local construction site. The worker was even kind enough to cut it for me!
- 2 - 12" spikes
- $0.70ea at Lowes (the photo shows 4 but I only used 2)
- If the spikes or bolts are going to touch your cheese they must be stainless steel which costs lots more. That's why I use the tile to elevate it.
- 1 scrap of tile flooring
- Free from construction site
- There was a whole pile of cut tile just sitting in a construction remnants heap
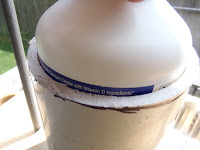
- 6" PVC pipe cut 6" long
- You guessed it, free from construction site
- 1 plastic cutting board sheet (optional)
- $0.50
- 2 for $1 at dollar store but just used one
- 1 disposable aluminum pan
- $1 at dollar store
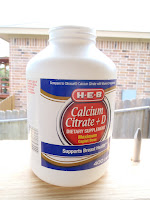
- 1 empty bottle from HEB calcium supplements
- Went around the house trying to find something to fit inside my PVC pipe.
- This bottle fits exactly
- HEB is a Texas grocery store, if you don't have an HEB, go around your house to see what will fit. Peanut butter jars come close
- Use only plastic, wood, ceramic, or stainless steal - no glass - you don't want shards in your cheese if it breaks
- Ironically I'll get calcium from my cheese
- Drill with large and small drill bits
- $0 already own
- Wood clamp
- $0 already own
- Saw for PVC pipe (and maybe the wood)
- $0 already own
- A big strong man whom you can bribe to cut the PVC pipe for you, an out of shape geeky husband, or you can do it yourself if your neck is healthier than mine
- 1 cold glass limeade
- 1 - 50lb bag sand
- $0 - already own
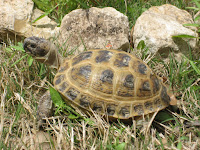
- Used to be for our tortoise, Sheila, rest her soul :(
- 1 to 2 pairs of old khaki pants or jeans that no longer fit your husband
- $0 - he's been eating too well lately
- Sewing machine and/or needle and thread
- $0 - already own (it was a lot more than $0 when I bought it though)
- Funnel $0
- Bucket $0
- Permanent marker, ruler, tape measure, pencil, etc. $0
Whew! That's quite a list. Here's the
Shortened Shopping / Scavengering List
- 2 - 2"x6" boards ~14-16" long
- 2 - 12" spikes
- 6" PVC pipe cut 6" long
- 1 plastic cutting board sheet (optional)
- 1 disposable aluminum pan
- 1 empty bottle from HEB calcium supplements (or whatever fits)
- Drill with large and small drill bits
- Wood clamp
- Saw for PVC pipe (and maybe the wood)
- 1 - 50lb bag sand
- 1 to 2 pairs of old khaki pants or jeans
- Sewing machine and/or needle and thread
- Funnel
- Bucket
- Permanent marker, ruler, tape measure, pencil, etc.
So far you're probably thinking, I'll shell out the 50 bucks. Really it's not that hard, and kind of fun to see how cheaply you can make it. On to the construction!
How to make the Cheese Press
- Trim your wood and PVC pipe to the dimensions you want
- It doesn't really matter if the top part of the pipe is cut straight, but the bottom must be.
- I used the original end for the bottom and the husband cut end for the top.
- Drill Drain holes in your pipe - just big enough for the whey to come out but not the curd
- I'm still not sure how big the holes should be so I'm saving my big piece of PVC pipe just in case I need a new mold
- Drill holes big enough for your spikes to slide through but not wiggle a lot
- Put your tile on one of the boards
- Put your pipe on top of the tile
- Mark an equidistance from each edge outside of your tile for your spikes to go through
- You want enough room away from the edge so that your board doesn't split when drilled
- Drill holes for your spikes on each side of the board
- I didn't have a big enough drill bit, so I used my biggest one, then wiggled it to increase it
- Be careful with power tools!
- Mark your second board from the first board's holes
- Repeat drilling for second board
- Put the plastic sheet over your bottom board and mark the holes
- Drill holes in the plastic sheet (I still need to trim my sheet)
- That's it for the cheese press, just assemble it.
- The bottle will go inside the mold.
- The bottle is a combination of follower and pusher.
- I'm hoping it will hold up with weight. It's a strong bottle.
- The bottle will also hold warm water which some recipes call for
- The spikes are a little too short for when there is actually cheese in the mold and the bottle will be sticking up. I am currently thinking of an easy solution...
- Spring tension cheese presses are the easiest to use, but require some engineering skills
I give my cheese press 4 buttons up
I'm not sure how it'll work, but it was under $3 and lots of fun to make
How to Make Cheese Press Sand Weights
You can use whatever you have lying around for weights. I was going to use bricks from the construction site, but I can't lift that much and my husband didn't want to. He suggested sand. I'm going to make mine out of sand and old pant legs. If you have old barbell weights, hooray, use those!
- Make sure your sand is dry
- While wet sand may weigh more, it also grows algae and/or mold, and is not always a consistent weight
- Measure out 5lbs in a ziplock bag
- Measure out 10lbs in a gallon milk jug
- Cut off a section of pant leg that the ziplock will fit in with lots of extra fabric for a seam
- It's better to have more than not enough because you don't want sand in your sewing machine
- Now that you know what 5lbs looks like, cut a section of pant leg for 10lbs
- You'll need a total of 50lbs - at least to start with
- I recommend 2 - 5lb and 4 - 10lb, or you can do lots of different weights
- I used a 5/8" seam allowance with a short straight stitch and then a zig zag stitch next to it, lots of backstitching on the ends
- If this made you go, huh?, just do the best you can sewing up the sides
- Leave a hole to pour the sand in, but not too big a hole. The more you sew up front, the less you have to deal with sand near your sewing machine.
- You can sew seams and turn right side out, or not, it's not a pretty weight contest.
- Use a funnel to pour your sand in your new sand bag
- I use the gallon jug for 10lbs just to get an idea so that I'm not weighing the bag every 30 seconds
- For a 5lb bag I used a food scale
- I used a bathroom scale for the 10lb bag
- I think it'll be ok if my bag is 10.2lbs
- Carefully sew up the opening using either your sewing machine if you know what you're doing or a needle and thread
- I will probably use a bucket on top of my board to put the weights in, but I might be able to stack them as well
- You could just use the bucket and sand without the fabric, but I think the fabric makes it a lot less messy and more manageable
- You could use ziplock bags, but sand is heavy and bags break
- Mark each weight with a permanent marker the number of pounds for future reference
- You could even stitch the number if you were adventurous
photos of weights coming soon
I give the sand weights 3 buttons
Labor intensive, but they'll work and store well
So that's pretty much it for constructing my cheese press. I think it took longer to do this blog entry than it did to make the press.
I give the sand weights 3 buttons
Labor intensive, but they'll work and store well
So that's pretty much it for constructing my cheese press. I think it took longer to do this blog entry than it did to make the press.
Neck Update
I made the cheese press this weekend. I felt lots better this morning than I've felt in a few days, so I went grocery shopping, overdid it, and am now lying on my back againWell, I've got a chocolate cake coming out of the oven that smells seriously good. Until next time.


No comments:
Post a Comment